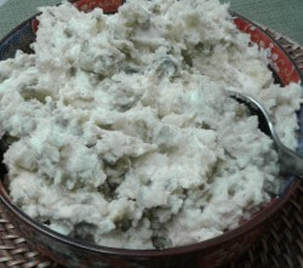
POTATO SALAD OLIVIA
6 large potatoes 4 eggs 4 large pickles (not sweet) 3 pieces of big boneless chicken breasts 1 can of sweet peas (drained) 1 white onion to cook with chicken Mayonnaise Salt & Pepper Shared from the recipe files of Wendy Anderson |
Cook chicken in water with sliced onions – about 60-90 minutes
Place chicken in a large pot with onion, salt & pepper add water to cover. Cover pot and bring to a boil; reduce heat to a gentle boil and cook for about 90 minutes, or until chicken meat is falling off of the bone. Remove chicken, let cool and shred. Boil potatoes (peeled) and eggs together for about 45 minutes or until potatoes are done. When cool enough to handle, grate potatoes & peeled eggs into large bowl. Add shredded chicken, can of sweet peas (drained), pickles, and mayonnaise. Salt & pepper to taste. You may wish to add more pickles and mayonnaise based on taste. Sometimes the size of the chicken and potatoes affect the ingredients. And it always tastes better cold the next day. |
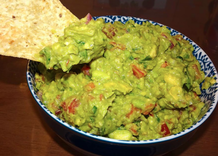
HOMEMADE GUACAMOLE by Chef John Nishio
This guacamole recipe was once used at the Ralphs Deli, until recently, and used at the Fremont Casino in Vegas. HOMEMADE GUACAMOLE, NISHIO-STYLE 5-6 small avocados cut into chunks 2 Roma Tomatoes finely chopped 1 Lime 1/2 cup Onion finely chopped 2 tbsp Garlic Salt 1 tsp Black Pepper 1 tsp Garlic Powder 3 tbsp Pace Chunky Salsa 1 cup chopped Cilantro with the stems removed Cut avocados in half and remove the seeds. Scoop out the avocado into a bowl after slicing it up in the skin with a butter knife Squeeze the juice of one lime onto the avocado pieces. Add Garlic Salt, Black Pepper and Garlic Powder Mash the avocados and spices leaving small lumps if you like Add chopped Cilantro, Onion and Tomatoes. Add Pace Chunky Salsa Stir everything together Season to taste with salt and pepper You can eat it now, or cover with plastic wrap and chill for a couple of hours in the fridge. This should keep for two to three days if tightly covered with plastic wrap and stirred before eating. |
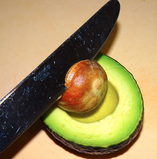
If you need to remove the avocado half from the skin whole, easily, do it sushi bar style. Slice off the stem end and run a sharp knife around, slicing it in half. Twist the avocado in half, so the seed is left on one side. Strike the seed with a butter knife, embedding the knife in the seed, and twist out the seed. Pinch the seed off the knife from the back of the blade, and it should fall right off. To remove the avocado whole from the skin, run a butter knife between the skin and the flesh of the avocado. Then run the knife under the center of the avocado, and it should all lift out in one neat piece.
With the half an avocado intact, you can lay it on the cutting board and slice it easily. By dragging a knife across the avocado while holding the knife at a steep angle upward, and the tip of the blade cutting on the cutting board through the avocado, you can easily slice the avocado into wafer thin slices for salads or to top a sushi roll. This guacamole recipe was once used at the Ralphs Deli, until recently, and used at the Fremont Casino in Vegas. To slice avocados, Sushi Bar Style, cut off the stem end, then remove the seed with a butter knife, by striking the seed with the knife, and twisting out the seed. To remove the seed from the knife, pinch it from the back of the blade, and it should fall off. Be knife safe! |
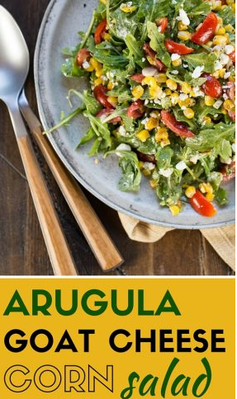
Arugula-Goat Cheese Corn Salad
Recipe from GarnishwithLemon.com as seen on Yummly
6 servings
INGREDIENTS:
Recipe from GarnishwithLemon.com as seen on Yummly
6 servings
INGREDIENTS:
- 4 tablespoons extra virgin olive oil, divided
- 5 ears sweet corn, husked and cut off cob
- 3 green onions, sliced
- 2 cups grape tomatoes, quartered
- 1 cup goat cheese, crumbled
- 4 cups arugula, chopped
- Juice of half of a lemon
- 2 tablespoons white wine vinegar
- Heat 1 tablespoon olive oil in a large nonstick skillet over medium high heat. Add corn and cook until slightly charred. Remove from heat and let cool.
- In a large bowl add cooled corn, green onions, tomatoes, goat cheese and arugula. Squeeze lemon juice over the corn mixture and add white wine vinegar and remaining olive oil. Stir gently to combine. Season to taste with salt and pepper.
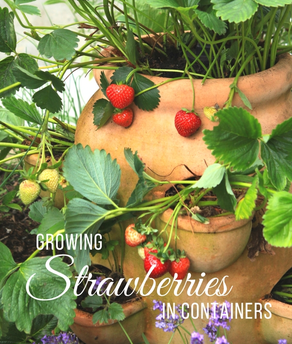
Strawberries! Everyone’s Favorite
Strawberry Season: Fresh strawberries are available year-round in many regions of the country, with the peak season from April to June.
Buying Strawberries: Buy strawberries that are bright red (with no white or green around the stem), fragrant, and plump, with no soft spots. It’s often hard to tell due to packaging but take your time in looking at strawberries through the basket.
Storing Strawberries: If you are using them right away, it's best not to refrigerate them. Otherwise, lay the berries flat on a paper-towel-lined plate and refrigerate for up to 2 days. Do not rinse or hull until ready to use.
Growing Strawberries are easy: Check with your local nursery to find out the best growing times for your area.
Growing Strawberries in a Container: Great article by Stephanie Rose at https://GardenTherapy.ca. She also has some good recipes. Direct link at https://gardentherapy.ca/growing-strawberries-in-containers/
Photo: From Garden Therapy
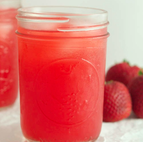
REFRESHING STRAWBERRY LEMONADE
Author: Chelsea @ Gal on a Mission www.galonamission.com Serves: 7-8 cups INGREDIENT
|
INSTRUCTIONS
|
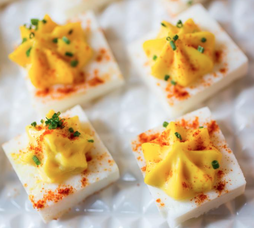
RIDICULOUSLY EASY SQUARE DEVILED EGGS
by FoodNetwork.com Kitchen Total Time: 55 min Yield: about 4 dozen INGREDIENTS:
Paprika and sliced chives, for garnish, optional SPECIAL EQUIPMENT: a pastry bag fitted with a small round pastry tip |
DirectionsWatch how to make this recipe.
Special equipment: a pastry bag fitted with a small round pastry tip Preheat the oven to 350 degrees F. Coat an 8-inch square baking dish with cooking spray. Separate the egg whites and yolks into 2 small bowls; set aside the yolks. Whisk the whites until just foamy, transfer them to the prepared baking dish, cover the dish with foil and bake until the whites have fully set, about 20 minutes. Let cool completely in the baking dish. While the whites are baking, beat the yolks until smooth. Lightly coat a medium nonstick skillet with cooking spray. Add the yolks, and scramble over medium low until fully cooked and slightly dry, 4 to 5 minutes. Transfer the yolks to a food processor. Add the mayonnaise, vinegar, mustard, 1/4 teaspoon salt and a few grinds of pepper, and pulse until smooth and creamy. Transfer the yolk mixture to a pastry bag fitted with a small round tip. Turn the egg whites out of the baking dish onto a cutting board. Cut into even 1-inch squares. Pipe swirly dollops of the egg yolk onto each square. Sprinkle each with paprika and chives if using. Copyright 2015 Television Food Network, G.P. All rights reserved. http://www.foodnetwork.com/recipes/food-network-kitchen/square-deviled-eggs |
|
AZALEA COCKTAIL
This drink is a perfect Spring Wedding Signature Cocktail drink. It’s light and refreshing. INGREDIENTS:

|
INSTRUCTIONS:
Note: Gin can be substituted for vodka Use non-wheat vodka to make this gluten-free PITCHER of cocktail: Figure out the recipe based on the size of your pitcher. Put all the ingredients except vodka and chill til cold. When ready to serve, add vodka and chill about 10 minutes then serve as above. |
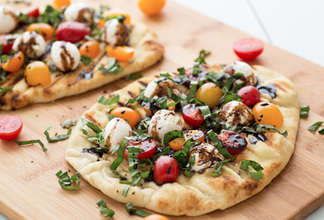
GRILLED CAPRESE NAAN PIZZA - Kiersten, ohmyveggies.com
Prep: 5 minutes Cook: 10 minutes - Serves 2
INGREDIENTS:
1/4 c. balsamic vinegar
2 naan
Olive oil mister or cooking spray
A handful or two of cherry or grape tomatoes, halved (use heirloom if you can!)
A handful or two of small fresh mozzarella balls (ciliegine)
1/4 c. fresh basil ribbons
Salt + pepper to taste
instructions
- Heat balsamic vinegar in a small saucepan over medium heat. Simmer until syrupy and reduced to about a tablespoon, 8-10 minutes.
- Heat a grill pan over medium-high heat. Spray both sides of one naan with olive oil and place it in the pan, pressing down on the top of it with a spatula to sear. Cook on each side until just beginning to char, about 2-3 minutes. Repeat with second naan.
- Top each naan with tomatoes, cheese, and basil. Season with salt and pepper and drizzle with balsamic reduction. Cut into wedges and serve.
|
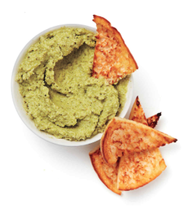
CAULIFLOWER-SPINACH DIP
INGREDIENTS 4 cups cauliflower florets 2 cups lightly packed spinach leaves 2 tablespoons tahini 2 tablespoons fresh lemon juice 3 tablespoons extra-virgin olive oil 1 coarsely chopped small garlic clove Salt and pepper Pita bread or crisps, for serving |
DIRECTIONS
Place cauliflower florets in a steamer basket set over a pot of simmering water. Cover and steam until crisp-tender, about 8 minutes. Add spinach leaves; cover and steam until wilted, about 2 minutes. Puree vegetables in a food processor with tahini, lemon juice, olive oil, garlic, salt, and pepper until smooth. Serve warm or at room temperature with pita bread or crisps. Recipe from www.MarthaStewart.com |
|
EASY CHICKEN TORILLA SOUP by www.chefsavvy.com
Prep: 10 min Cooking: 20 min - SERVES 4 This Easy Chicken Tortilla Soup is a comforting, flavorful and fast dinner. INGREDIENTS 1 tablespoon olive oil ½ onion, diced 4 garlic cloves, minced 2 cups chicken broth 1 (10 ounce) can enchilada sauce (medium) 1 cup crushed tomatoes 1 (15.5 ounce) can black beans, drained and rinsed 1 cup frozen corn ½ teaspoon cumin ¼ teaspoon paprika ¼ teaspoon black pepper 2 cups shredded chicken breasts, cooked 1 tablespoon lime juice (about half of a lime) 1 tablespoon fresh cilantro, chopped avocado for garnish, if desired tortilla strips for garnish, if desired cilantro for garnish, if desired |

INSTRUCTIONS
Add oil to a large saucepan. Add in onion and saute for 2-3 minutes. Add in garlic and cook for 1 minute. Pour in chicken broth, enchilada sauce, crushed tomatoes, black beans, corn, cumin, paprika and pepper. Bring to a simmer and cook for 10 minutes. Stir in precooked shredded chicken and warm through. Take off of the heat and add in lime juice and cilantro. Serve immediately and garnish with avocado, tortilla strips or cilantro if desired. |

|
CHOCOLATE-COVERED STRAWBERRY FOOTBALLS by Catherine Clark as seen on Yummly
Catherine Clark - www.bijouxandbits.com Prep Time: 30 minutes Total Time: 30 minutes Ingredients
|
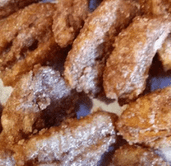
OLD-FASHIONED ROASTED PECANS – Allrecipes.com
1 egg white
1 tablespoon water
2 1/4 cups pecan halves
1/2 cup white sugar
1/4 teaspoon salt
1 1/2 teaspoons ground cinnamon
Directions
Preheat oven to 225 degrees F (105 degrees C). Lightly grease a rimmed baking pan.
Combine the egg white and water in a mixing bowl; beat until fluffy. Fold in the pecans to coat evenly. Combine the sugar, salt, and ground cinnamon in a shaker or cup with a lid. Dust the pecans evenly with the sugar mixture. Spread the nuts over the prepared pan.
Bake in preheated oven until toasted and fragrant, stirring every 15 minutes, about 1 hour. Cool on pan, and store in an airtight container.
ALL RIGHTS RESERVED © 2016 Allrecipes.com
Printed From Allrecipes.com 12/25/2016
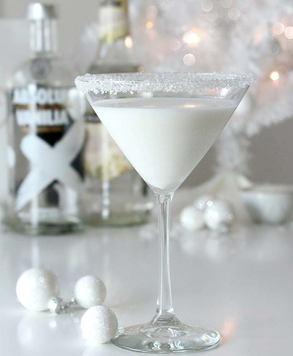
White Chocolate Snowflake Martini from lulus.com
We’ve been dreaming of a winter wonderland this year, and although we may not get actual snow here in sunny California, we’ll have just as much fun with the perfect winter cocktail – the White Chocolate Snowflake Martini! It’s the perfect blend of sweet and creamy that will have you feeling the holiday cheer in no time. Check out the recipe below to whip up this refreshment!
Ingredients (makes one drink)
2 oz. vanilla vodka
2 oz. Godiva white chocolate liqueur
1 oz. white creme de cacao
1 oz. half and half
Lemon wedge
Sanding sugar
Directions
Cut a half-inch slit into the lemon wedge and rub it around the rim of the glass. Pour sanding sugar into a shallow dish then dip the rim in the sugar to coat evenly. Gently shake off excess sugar. Add the vodka, chocolate liqueur, creme de cacao, and half and half into a shaker filled with ice. Shake well and strain mixture into glass.
Serve immediately, and enjoy with your favorite seasonal tunes next to a toasty fireplace!
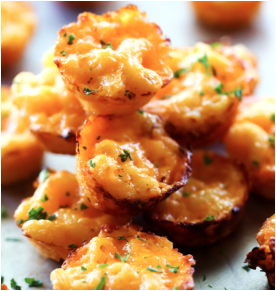
MAC AND CHEESE BITES by Chefs in Training by Nikki www.Chef-n-Training.com
These bites are the PERFECT finger food or appetizer!
INGREDIENTS:
These bites are the PERFECT finger food or appetizer!
INGREDIENTS:
- ½ pound elbow macaroni
- 2 Tablespoons butter
- 2 Tablespoons flour
- 1½ cups milk
- 2 cups shredded sharp cheddar cheese
- 2 ounces cream cheese
- ½ teaspoon salt
- ¼ teaspoon pepper
- 1 egg beaten
- Preheat oven to 400 degrees F.
- Spray mini muffin tins with cooking spray.
- Cook pasta according to packaged directions and set aside.
- In a medium size pan combine butter and flour over medium heat. Whisk until butter is melted and mixture is smooth. Slowly add milk and bring to a simmer. Add 1½ cups of the cheese, cream cheese, salt and pepper. Stir until smooth and creamy. Remove from heat.
- In a large mixing bowl, carefully stir pasta, cheese sauce, and egg until evenly mixed and pasta is evenly coated.
- Spoon mac and cheese into mini muffin tins and top each with a small pinch of remaining cheese. Bake at 400 degrees F for 15 minutes or until golden brown.
- Allow to cool 5 minutes before gently removing the bites.
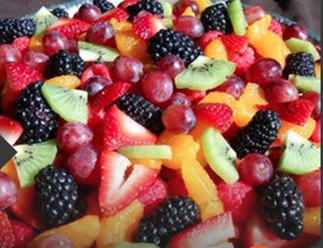
“THE PERFECT FRUIT SALAD” Recipe by: Nicole Graham Holley via yummly.com
"The perfect fruit salad for a backyard bbq or any occasion. There are never leftovers! This is one of my favorite fruit salad recipes, as I think the sauce really makes it. This salad is tastier the longer you can let it soak in its juices. I prefer 3 to 4 hours in the refrigerator before I serve it. Enjoy."
INGREDIENTS:
2 cups fresh pineapple (cubed)
2 cups strawberries (hulled and sliced)
3 kiwi fruits (peeled and sliced)
3 bananas (sliced)
2 orange (peeled and sectioned)
1 cup grapes (seedless)
2 cups blueberries
DIRECTIONS: Prep: 25 minutes: Cook: 5 min; Ready: 3 hrs. 30 min.
Bring orange juice, lemon juice, brown sugar, orange zest, and lemon zest to a boil in a saucepan over medium-high heat. Reduce heat to medium-low, and simmer until slightly thickened, about 5 minutes. Remove from heat, and stir in vanilla extract. Set aside to cool.
Layer the fruit in a large, clear glass bowl in this order: pineapple, strawberries, kiwi fruit, bananas, oranges, grapes, and blueberries. Pour the cooled sauce over the fruit. Cover and refrigerate for 3 to 4 hours before serving.
"The perfect fruit salad for a backyard bbq or any occasion. There are never leftovers! This is one of my favorite fruit salad recipes, as I think the sauce really makes it. This salad is tastier the longer you can let it soak in its juices. I prefer 3 to 4 hours in the refrigerator before I serve it. Enjoy."
INGREDIENTS:
- cup fresh orange juice
- cup fresh lemon juice
- cup brown sugar (packed)
- tsp grated orange
- tsp grated lemon zest
2 cups fresh pineapple (cubed)
2 cups strawberries (hulled and sliced)
3 kiwi fruits (peeled and sliced)
3 bananas (sliced)
2 orange (peeled and sectioned)
1 cup grapes (seedless)
2 cups blueberries
DIRECTIONS: Prep: 25 minutes: Cook: 5 min; Ready: 3 hrs. 30 min.
Bring orange juice, lemon juice, brown sugar, orange zest, and lemon zest to a boil in a saucepan over medium-high heat. Reduce heat to medium-low, and simmer until slightly thickened, about 5 minutes. Remove from heat, and stir in vanilla extract. Set aside to cool.
Layer the fruit in a large, clear glass bowl in this order: pineapple, strawberries, kiwi fruit, bananas, oranges, grapes, and blueberries. Pour the cooled sauce over the fruit. Cover and refrigerate for 3 to 4 hours before serving.
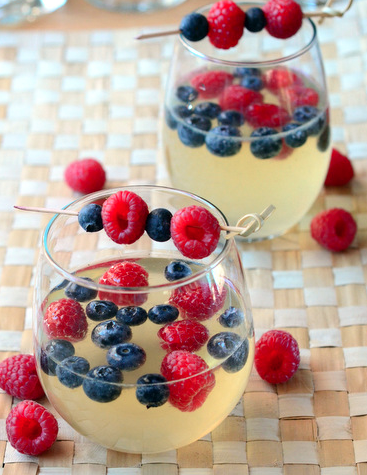
Red, White and Blue Sangria
Inspired by Summer Favorites - Lemonade & 4th of July
Baking Bites
1 cup sugar
1 cup water
1 1/2 tsp vanilla extract
2 1/2 cups white wine (pref. Sauvignon Blanc)
1 cup fresh, strained lemon juice
1/2 cup fresh raspberries
1/2 cup fresh blueberries
In a small sauce pan, combine sugar and water and bring to a simmer, stirring until the sugar is dissolved. When sugar is dissolved, remove from heat and stir in vanilla extract. Allow the syrup to cool to room temperature.
In a pitcher, combine white wine, lemon juice and 1 cup of cooled syrup (you may have extra syrup). Stir to blend and chill until ready to serve.
Berries can be added to the pitcher or divided into individual glasses.
Serves 4.
Recipe can be doubled/tripled/etc. for larger batches.
Sangria is a fantastic entertaining drink in the summer. It’s a combination of fruit juices and wine that, together, make a sweet and refreshing beverage. You can make sangria with all kinds of different fruits and can use either red or white whine for the base. You can also make them in large batches ahead of a party, so you don’t need to worry about any last-minute preparation. This particular Red, White and Blue Sangria is inspired by two of the writer’s favorite summertime things: lemonade and the Fourth of July. The “white” portion of the drink is white wine, while the “red” and “blue” elements are fresh berries that are added before serving.
The light, refreshing sangria starts with a lemonade base, made with vanilla simple syrup, which is added to white wine. Sauvignon Blanc is the best choice for this particular sangria. Most sauvignon blancs are not aged in oak, resulting in wines that are lighter bodied and better suited to mixing with additional ingredients. Sauvignon blancs also typically have prominent notes of citrus (with some tending towards either tart green apple notes or sweet tropical fruit flavors), which blend very well with the lemon juice used in this recipe. Fresh lemon juice is always going to give you the best flavor and the juice should always be strained to remove any pulp.
Make the sangria a few hours before you want to serve it, then store it in the refrigerator to make sure it is well-chilled. If you are making it closer to serving time, you will probably want to throw a few ice cubes in it. Ice cubes will not negatively effect the sangria in any way – but you will want to drink it a touch faster so that the drink doesn’t get too watered down. This recipe makes a relatively small batch, however it can easily be doubled or quadrupled to make enough for larger parties.
If you want to make a nonalcoholic version for kids, simply replace the wine with equal parts lemon juice and water (making lemonade) and sweeten to taste.
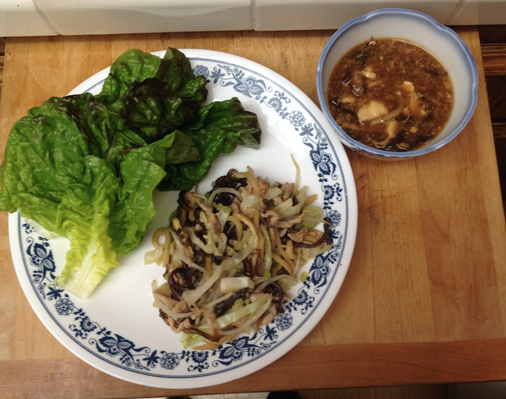
QUICK EASY & HEALTHY by Chef Glen Ochi
Moo Shu Pork in Lettuce Wrap
Ingredients:
2 Tablespoon Vegetable oil
6 cloves Garlic, minced
1 pound Pork loin, thin slices 1/8” thick strips
1 cup Chinese wood ear mushrooms, thinly sliced 1/16” strips (fresh is better)
1 cup Bamboo shoots, thin strips (canned
2 cups Cabbage, thin strips 1/4 inch slices
1/2 cup Bean sprouts
1 Tablespoon Soy sauce
1 Tablespoon Oyster sauce
1 Tablespoon Hoisin sauce
To taste Salt
To taste Pepper
As needed Red leaf lettuce leaves
Optional Hoisin sauce
Directions:
This is a quick and easy dish to prepare and very healthy by using lettuce wraps. Lettuce choice can be any of your favorites such as iceberg, romaine, and green leaf.
Moo Shu Pork in Lettuce Wrap
Ingredients:
2 Tablespoon Vegetable oil
6 cloves Garlic, minced
1 pound Pork loin, thin slices 1/8” thick strips
1 cup Chinese wood ear mushrooms, thinly sliced 1/16” strips (fresh is better)
1 cup Bamboo shoots, thin strips (canned
2 cups Cabbage, thin strips 1/4 inch slices
1/2 cup Bean sprouts
1 Tablespoon Soy sauce
1 Tablespoon Oyster sauce
1 Tablespoon Hoisin sauce
To taste Salt
To taste Pepper
As needed Red leaf lettuce leaves
Optional Hoisin sauce
Directions:
- Heat oil and slightly brown the minced garlic.
- Add in the thin pork strips and brown.
- Add in the cabbage and allow to stir fry till half cooked.
- Add in the canned bamboo and fresh wood ear mushrooms, mix well.
- Once these ingredients have stir fried a bit without over cooking them, adjust the seasonings as you may need a bit more salt.
- Add in bean sprouts last.
- Serve hot with lettuce leaves and can place some hoisin sauce on lettuce
This is a quick and easy dish to prepare and very healthy by using lettuce wraps. Lettuce choice can be any of your favorites such as iceberg, romaine, and green leaf.
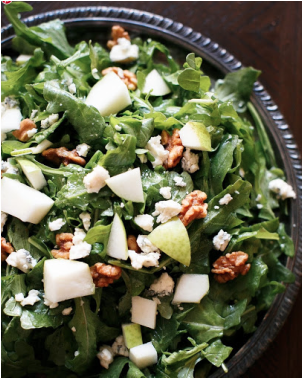
Irresistibly Easy Salad - Arugula, Pear, Gorgonzola & Candied Walnuts
Julie Blanner - www.JulieBlanner.com
This recipe is for my pear & walnut salad. Topped with fresh gorgonzola, candied walnuts, & ripe barlett pears {which is key – they’re unbelievably tender & flavorful!}. I recreated this salad after my favorite restaurant in Kansas City discontinued it. It tastes even better than it looks.
Ingredients:
arugula
creamy gorgonzola {honestly, anything but pre-crumbled}
candied walnuts
bartlet pear, ripe
dressing:
1/3 c olive oil
1/3 c white wine vinegar
½ tsp minced garlic
pepper
Instructions: In a jar with airtight lid, shake the second set of ingredients. Toss with arugula & top with gorgonzola, walnuts & ripe pear.

RECIPE: EASY PEPPERMINT ESSENTIAL OIL INFUSED CHOCOLATE DIPPED RICE KRISPIES TREATS
Easy peasy Peppermint essential oil-infused chocolate dipped rice treats! Chop into mini squares some pre-made Rice Krispies Treats or make some home-made. Get some semi-sweet chocolate chunks from Trader Joe’s and melt. Stir in 5-8 drops of Young Living Peppermint Vitality essential oil. Dip half of each into the melted chocolate and set on a piece of wax paper. Let cool in the fridge to set. Then gobble up whenever you like.
Easy peasy Peppermint essential oil-infused chocolate dipped rice treats! Chop into mini squares some pre-made Rice Krispies Treats or make some home-made. Get some semi-sweet chocolate chunks from Trader Joe’s and melt. Stir in 5-8 drops of Young Living Peppermint Vitality essential oil. Dip half of each into the melted chocolate and set on a piece of wax paper. Let cool in the fridge to set. Then gobble up whenever you like.
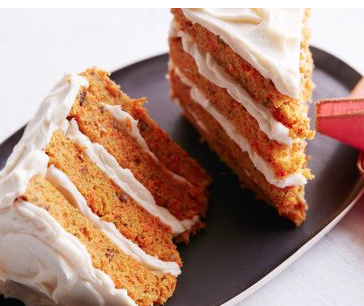
CARROT CAKE FOR TWO
Total Time: 2 hr 55 min PREP:30 min COOK: 35 min Yield:2 servings Level:Easy
INGREDIENTS;
CAKE:
Cooking spray
1/4 cup pecans
2/3 cup all-purpose flour
1 teaspoon baking powder
1/2 teaspoon ground cinnamon
1/4 teaspoon kosher salt
Pinch freshly grated nutmeg
1/2 cup granulated sugar
1 large egg, at room temperature
1/4 cup vegetable oil
1/2 teaspoon pure vanilla extract
5 ounces carrots (about 3 small), finely grated (about 1 cup)
FROSTING:
8 ounces cream cheese, at room temperature
1 stick (8 tablespoons) unsalted butter, at room temperature
3/4 cup confectioners' sugar
1/2 teaspoon pure vanilla extract
DIRECTIONS
For the cake: Preheat the oven to 350 degrees F. Line a 9-by-2-inch round cake pan with parchment, and lightly coat with cooking spray. Toast the pecans on a small baking sheet until lightly browned and fragrant, about 8 minutes. Let cool, then coarsely chop.
Whisk together the flour, baking powder, cinnamon, salt and nutmeg in a medium bowl. Make a big well in the center so you can see the bottom of the bowl. Working within the well, add the sugar and egg and beat with a fork until well combined, then add the oil and vanilla and beat with the fork. Stir the dry and wet ingredients together with the fork until just combined. Fold in the carrots and pecans.
Transfer the batter to the prepared pan, and bake until a toothpick comes out clean, 20 to 25 minutes. Let the cake cool in the pan on a cooling rack for 20 minutes, then turn it out of the pan, remove the parchment and let cool completely, right-side up, on the rack, about 1 hour.
For the frosting: Process the cream cheese and butter in a food processor until completely combined and smooth, stopping once or twice to scrape the bottom and side of the bowl. Add the confectioners' sugar and vanilla, and process until just combined. Transfer to a small bowl.
To assemble: Cut the cake into 4 even wedges, as if you were cutting up a pie. Frost the top of each wedge with about 3 tablespoons of frosting (an offset spatula helps spread the frosting evenly). Stack the frosted wedges directly on top of each other on a serving plate, resulting in a 4-layer slice of cake with frosting between the layers and on top. Completely cover the curved back side of the cake with the remaining frosting, and leave the 2 remaining sides open. Refrigerate for at least 30 minutes. Cut the wedge in half, and serve.
Copyright 2015 Television Food Network, G.P. All rights reserved. From Food Network Kitchen
© 2016 Television Food Network, G.P. All Rights Reserved.

Tiny Taco Bites
Prep Time:10 Min Cook Time:12 Min Total Time:25 Min
Serves 24
Ingredients
8 corn tortillas (75 g)
8 oz pork shoulder, roasted (or other leftover meat) (227 g)
1.5 tbsp taco seasoning, homemade (9 g)
6 tbsp salsa (96 g)
1 lettuce leaf, shredded (9 g)
1 tbsp cheese, finely shredded (7 g)
Equipment Needed
mason jar (or something of equal size to cut mini tortillas)
24 cup mini muffin tin
Instructions
Preheat oven to 400F.
Using your mason jar as a guide, cut three mini tortillas from each large tortilla, making a total of 24. She found she was able to stack and cut through 3 large tortillas at once.
Mix together the meat and taco seasoning.
Microwave mini tortillas for 15 seconds. This helps make them pliable.
Place one mini tortilla and 1 tsp of meat in each mini muffin tin. The meat will act as a weight and help keep the shape of the bites.
Work quickly! Once the tortillas cool, they become more difficult to bend.
Bake in the oven for 12 minutes or until tortillas are golden brown.
Allow to cool for 3 minutes. The tortillas will continue to get crispy as they sit.
Remove from muffin tin and top each with salsa, lettuce, and cheese.
Enjoy!
Notes
The cook buys a pork shoulder, roast it overnight at 200F, shred it, and use it throughout the week. It works great for these tacos! She also tried chicken which was tasty and next going to try beans. Making your own taco seasoning is not only easy and cheaper than buying store-bought, it also doesn't contain any preservatives. Here's one of her favorite recipes. This recipe makes 24 bites. She suggest 6 bites per person which is the equivalent of 2 full tacos.
crafty coin http://craftycoin.com/
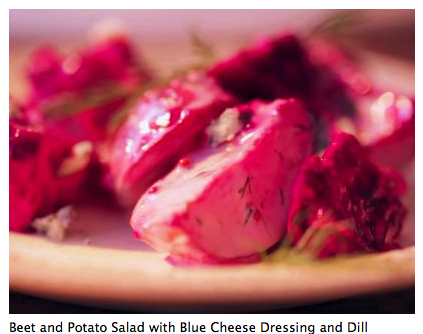
THINK PINK POTATO SALAD
Beet and Potato Salad with Blue Cheese Dressing and Dill
Recipe courtesy of Damaris Phillips, Food Network
Beet and Potato Salad with Blue Cheese Dressing and Dill
Total Time: 5 hr 5 min
Prep: 20 min
Inactive: 4 hr 10 min
Cook: 35 min
Yield:4 servings
Level:Easy
Ingredients
2 pounds new potatoes, quartered
3 tablespoons coconut oil
Kosher salt and freshly ground black pepper
1 pound beets, peeled and cut into 1/2-inch dice
2/3 cup mayonnaise
1/3 cup buttermilk
2 tablespoons whole-grain mustard
1 cup chopped celery (about 2 stalks)
1/4 cup chopped green onions (just the greens)
2 tablespoons chopped fresh dill
4 ounces blue cheese, crumbled (I like Smokey Blue best)
Directions
Preheat the oven to 400 degrees F.
In a bowl, toss the potatoes with 2 tablespoons of the coconut oil to coat. Sprinkle with salt and pepper, then spread the potatoes out in a single layer on a baking sheet. Toss the beets with the remaining 1 tablespoon coconut oil; sprinkle with salt and pepper and spread out in a single layer on a second baking sheet. Add 2 tablespoons water to the beets. Transfer the baking sheets to the oven and bake for 35 minutes, or until the potatoes are golden brown, stirring halfway through. If the beets start to look dry, add a little more water. Set aside to cool for 10 minutes.
Meanwhile, make the dressing: Add the mayonnaise to a bowl and whisk in the buttermilk and mustard. Set aside.
Transfer the cooked potatoes and beets (and any accumulated beet juices) to a salad bowl. Add the celery, green onions, dill, the dressing and some salt and pepper. Toss to coat well with dressing. Cover and refrigerate for 4 hours. Just before serving fold in the blue cheese.
Recipe courtesy of Damaris Phillips
Advertisement
© 2016 Television Food Network, G.P. All Rights Reserved.
Read more at: http://www.foodnetwork.com/recipes/damaris-phillips/beet-and-potato-salad-with-blue-cheese-dressing-and-dill.print.html#?oc=linkback
Beet and Potato Salad with Blue Cheese Dressing and Dill
Recipe courtesy of Damaris Phillips, Food Network
Beet and Potato Salad with Blue Cheese Dressing and Dill
Total Time: 5 hr 5 min
Prep: 20 min
Inactive: 4 hr 10 min
Cook: 35 min
Yield:4 servings
Level:Easy
Ingredients
2 pounds new potatoes, quartered
3 tablespoons coconut oil
Kosher salt and freshly ground black pepper
1 pound beets, peeled and cut into 1/2-inch dice
2/3 cup mayonnaise
1/3 cup buttermilk
2 tablespoons whole-grain mustard
1 cup chopped celery (about 2 stalks)
1/4 cup chopped green onions (just the greens)
2 tablespoons chopped fresh dill
4 ounces blue cheese, crumbled (I like Smokey Blue best)
Directions
Preheat the oven to 400 degrees F.
In a bowl, toss the potatoes with 2 tablespoons of the coconut oil to coat. Sprinkle with salt and pepper, then spread the potatoes out in a single layer on a baking sheet. Toss the beets with the remaining 1 tablespoon coconut oil; sprinkle with salt and pepper and spread out in a single layer on a second baking sheet. Add 2 tablespoons water to the beets. Transfer the baking sheets to the oven and bake for 35 minutes, or until the potatoes are golden brown, stirring halfway through. If the beets start to look dry, add a little more water. Set aside to cool for 10 minutes.
Meanwhile, make the dressing: Add the mayonnaise to a bowl and whisk in the buttermilk and mustard. Set aside.
Transfer the cooked potatoes and beets (and any accumulated beet juices) to a salad bowl. Add the celery, green onions, dill, the dressing and some salt and pepper. Toss to coat well with dressing. Cover and refrigerate for 4 hours. Just before serving fold in the blue cheese.
Recipe courtesy of Damaris Phillips
Advertisement
© 2016 Television Food Network, G.P. All Rights Reserved.
Read more at: http://www.foodnetwork.com/recipes/damaris-phillips/beet-and-potato-salad-with-blue-cheese-dressing-and-dill.print.html#?oc=linkback
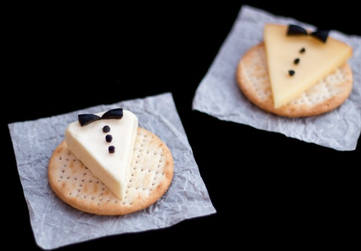
TUXEDO CHEESE & CRACKERS
Ingredients:
Pitted Black Olives
Any Crackers of your choice
Any Soft Cheese Triangles AND/OR Hard Cheese of your choice
Equipment
Drinking straw or Small round piping nozzlea
Cocktail Stick
A small sharp knife or scissors
Firstly, cut the hard cheese into triangles or peel the wrappers off the soft cheese triangles.
Then you just need to sit down at a table with a chopping board, the olives, the items listed in ‘Essential Equipment’ and start carving!
Use either a drinking straw or a small round piping nozzle to cut out little olive ‘buttons,’ (The cocktail stick will be helpful to remove the olive from the straw/nozzle.)
Either using a sharp knife (I used a vegetable carving knife) or some scissors, cut out little triangles to use for the bow ties. I found it easiest to cut each olive into quarters and flatten them first.
Then place the bow ties and buttons on each piece of cheese and serve on crackers to your happy guests!
- Kitchen Mason
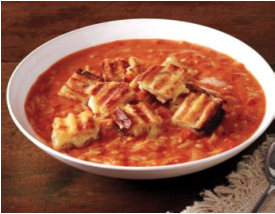
Easy Tomato Soup & Grilled Cheese Croutons
Recipe courtesy of Ina Garten
Easy Tomato Soup & Grilled Cheese Croutons
Total Time:50 min Prep:10 min Cook: 40 min Yield:4 to 6 servings Level:Easy
Ingredients
3 tablespoons good olive oil
3 cups yellow onions, chopped (2 onions)
1 tablespoon minced garlic (3 cloves)
4 cups chicken stock, preferably homemade
1 (28-ounce) can crushed tomatoes, preferably San Marzano
Large pinch of saffron threads
Kosher salt and freshly ground black pepper
1/2 cup orzo
1/2 cup heavy cream
Grilled Cheese Croutons (see below)
Directions
In a large pot or Dutch oven such as Le Creuset, heat the olive oil over medium heat. Add the onions and cook over medium-low heat for 15 minutes, stirring occasionally, until golden brown. Add the garlic and cook for 1 more minute. Stir in the chicken stock, tomatoes, saffron, 1 tablespoon salt and 1 teaspoon pepper. Bring the soup to a boil, then lower the heat and simmer for 15 minutes. Meanwhile, fill a medium pot with water, add 2 teaspoons salt and bring to a boil. Add the orzo and cook for 7 minutes. (It will finish cooking in the soup.) Drain the orzo and add it to the soup. Stir in the cream, return the soup to a simmer and cook for 10 more minutes, stirring frequently. Serve hot with Grilled Cheese Croutons scattered on top.
Grilled Cheese Croutons
4 (1/2-inch-thick) slices country white bread
2 tablespoons unsalted butter, melted
4 ounces Gruyere cheese, grated
Heat a panini grill. Place the four slices of bread on a cutting board and brush lightly with the melted butter, being sure to butter the corners. Turn the slices over and pile Gruyere on two of the slices. Place the remaining two slices of bread on top of the Gruyere, buttered sides up.
Grill the sandwiches on the panini grill for about 5 minutes, until nicely browned. Place on a cutting board, allow to rest for 1 minute and cut into 1-inch cubes.
Photographs by Steve Giralt Recipe from Barefoot Contessa Foolproof: Recipes You Can Trust. Copyright (c) 2012 by Ina Garten. By Arrangement with Clarkson Potter, a division of Random House, Inc. for Food Network MagazineAdvertisement © 2016 Television Food Network, G.P. All Rights Reserved.
Read more at: http://www.foodnetwork.com/recipes/ina-garten/easy-tomato-soup-grilled-cheese-croutons-recipe.print.html#?oc=linkback
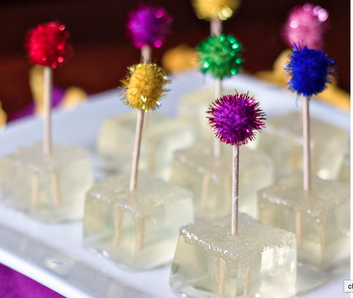
Champagne Jello Shots
Recipe adapted from Bakers Royale
Erica Sweet Tooth on www.Yummy.com
yield: 15 JELLO SHOTS
ingredients:10 oz plus 5oz champagne (or prosecco or sparkling wine)
1 tablespoon sugar
3 envelopes Knox plain gelatin
White sparkling sugar
directions:Place 10 oz of the champagne and sugar in a sauce pan and then sprinkle gelatin on top. Let gelatin soften for about 2 minutes.
Place saucepan over low heat and stir until gelatin has completely dissolved, about 2-3 minutes. Remove from heat and add in remaining 5 oz of champagne and stir to combine.
Pour mixture into a loaf pan (I used a square tupperware container) and chill for at least an hour.
To release Jello, dip the pan into warm water and use a knife along the sides to gently release the Jello. Use a sharp knife to cut squares. Before serving, dip the tops in the sparkling sugar and serve with a festive toothpick.
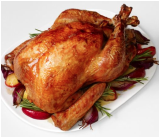
FOOD NETWORK’S ALTON BROWN’S Good Eats Roast Turkey
The most-important meal of the year is just weeks away, and that means it's time to secure your Thanksgiving turkey. With over 5,000 reviews and a 5-star rating to boot, Alton's most-popular turkey is the go-to, foolproof recipe for unmatchable results this year (and every year).
Alton Brown shares his tips and techniques for a perfectly cooked turkey.
Recipe from www.Network.com which is also featured in Food Network Magazine.
|
Ingredients
1 (14 to 16 pound) frozen young turkey For the brine: 1 cup kosher salt 1/2 cup light brown sugar 1 gallon vegetable stock 1 tablespoon black peppercorns 1 1/2 teaspoons allspice berries 1 1/2 teaspoons chopped candied ginger 1 gallon heavily iced water For the aromatics: 1 red apple, sliced 1/2 onion, sliced 1 cinnamon stick 1 cup water 4 sprigs rosemary 6 leaves sage Canola oil |
Directions
2 to 3 days before roasting: Begin thawing the turkey in the refrigerator or in a cooler kept at 38 degrees F. Combine the vegetable stock, salt, brown sugar, peppercorns, allspice berries, and candied ginger in a large stockpot over medium-high heat. Stir occasionally to dissolve solids and bring to a boil. Then remove the brine from the heat, cool to room temperature, and refrigerate. Early on the day or the night before you'd like to eat: Combine the brine, water and ice in the 5-gallon bucket. Place the thawed turkey (with innards removed) breast side down in brine. If necessary, weigh down the bird to ensure it is fully immersed, cover, and refrigerate or set in cool area for 8 to 16 hours, turning the bird once half way through brining. Preheat the oven to 500 degrees F. Remove the bird from brine and rinse inside and out with cold water. Discard the brine. Place the bird on roasting rack inside a half sheet pan and pat dry with paper towels. Combine the apple, onion, cinnamon stick, and 1 cup of water in a microwave safe dish and microwave on high for 5 minutes. Add steeped aromatics to the turkey's cavity along with the rosemary and sage. Tuck the wings underneath the bird and coat the skin liberally with canola oil. Roast the turkey on lowest level of the oven at 500 degrees F for 30 minutes. Insert a probe thermometer into thickest part of the breast and reduce the oven temperature to 350 degrees F. Set the thermometer alarm (if available) to 161 degrees F. A 14 to 16 pound bird should require a total of 2 to 2 1/2 hours of roasting. Let the turkey rest, loosely covered with foil or a large mixing bowl for 15 minutes before carving. Recipe courtesy of Alton Brown, also featured in Food Network Magazine Read more at: http://www.foodnetwork.com/recipes/alton-brown/good-eats-roast-turkey-recipe.html?oc=linkback |
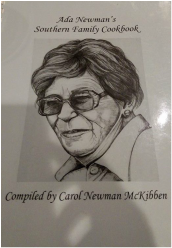
LEGACY RECIPE - ADA NEWMAN'S MACARONI & CHEESE submitted and story told by Carol Newman McKibben
As I grew up in the mountains of North Carolina, I considered my Mother to be the best cook alive. My brother and I, and our children, all have warm, wonderful memories of gathering around the table to experience her delicious meals.
Her cooking was a combination of old family recipes, contributions from friends, and dishes from Southern inns and restaurants that she liked. The recipes came from Kentucky, Virginia, Georgia, North and South Carolina, Louisiana, Alabama and Tennessee.
Oddly enough, my Mother didn’t like to cook. She just did it because everyone else enjoyed it. That was part of her charm. She loved to do nice things for family and friends.
After she passed away, I discovered her 60-year-old recipe box in her kitchen. As a gift to my family and friends, I put them all together in a book. At the top of everyone’s list was Mama’s Macaroni and Cheese. To this day, it remains the family staple. Easy and inexpensive, my husband Mark and I lived off it when we were first married. Hope you will enjoy as well!
Carol & Mark McKibbens' wedding: http://www.whitesatinweddingshow.com/carol--mark-mckibben.html
|
Ada Newman’s Macaroni and Cheese
1/2 stick of butter 2 tablespoons of flour 1 teaspoon of salt Pinch of pepper Garlic Salt to taste 2 ½ Cups of Milk 2 Cups (8 ounces) shredded Extra Sharp Cheddar Cheese 8 ounces (2 cups) elbow Macaroni Paprika |
In a saucepan, melt butter and garlic salt. Remove from heat, blend in flour, salt and pepper. Add milk. Heat stirring constantly until sauce thickens a little and is smooth. Add 1 ½ cups cheese and heat until melted, stirring. Meanwhile, cook Macaroni as directed and drain. Combine with sauce in a 2-quart casserole and top with remaining cheese and paprika.
Bake 350 degrees for 25-30 minutes or until nicely browned and bubbly. Makes 4 to 6 servings. Note: Over the years, I doubled the butter, flour and Macaroni to accommodate our large family! |
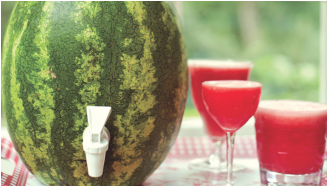
WATERMELON KEG
Great idea for backyard gatherings or weddings. Can be made with water or alcohol.
As seen on Yummly and Andrew Zimern
Modern PioneeringBy Georgia Pellegrini
Grandma Pellegrini and Great-Aunt Gray used to love to have garden parties, and I like to think that this would have been my creative contribution. A watermelon keg is a festive way to serve beverages on a hot summer day. You can fill the keg with whatever liquid you would like. Simply add water or a clear alcohol, which will then absorb the watermelon. Since the size of a watermelon will vary, keep in mind that there should be a 1:1 ratio between the amount of flesh and the amount of alcohol or water, and save any remaining watermelon for a Tipsy Watermelon Salad (opposite). You will need a spigot to make a proper keg, which can be purchased at home-brewing stores or on the Internet.
Ingredients: 1 Medium oval watermelon & 4-6 cups of water or alcohol
Servings: Makes 8 to 12 cups, depending on the size of the watermelon
Prep time: 10 minutes
Cook time: None
Total time: 10 minutes
- Cut off ½ inch from the bottom end of the watermelon so that it sits on a flat surface. Make sure that the surface that the watermelon will sit on isn’t cut too deep, just enough for it to sit evenly. Cut about 2 inches from the top end, cutting through the rind completely in order to get at the flesh.
- Using a large spoon, scoop out the watermelon flesh from the top of the watermelon and transfer it to a bowl, making sure to leave about 3 inches of flesh at the bottom of the watermelon for the spigot to nestle into.
- Determine where to place the spigot on the surface of the watermelon, then press it firmly into the rind to make an indentation. Using a pointed paring knife, create a small opening, making sure to cut inside the line of the circular indentation.
- Press the spigot gently into the hole. Scrape away the flesh on the inside of the watermelon to reveal the end of the spigot.
- In a blender, combine 4 to 6 cups of watermelon flesh with 4 to 6 cups of water or alcohol. Fill the watermelon with the liquid and serve over ice.